So, you are in a situation where you need to service, check or clean a certain solar inverter. Obviously, you need to make sure it is turned off.
Additionally, consider a currently running solar power plant with multiple inverters. It means that there are electrical loads drawing power from the solar panels and the DC to AC conversion is on going. So, how are we going to turn a solar inverter off?
Here is the step-by-step guide on how you turn off a solar inverter safely and properly.
Check And Read The Schematic Diagram Of The System
Go And Find The Solar AC Distribution Board
Turn The Inverter’s AC Breaker To Off Position
Go And Find The Solar Inverter
Turn The Inverter’s DC Switch To Off Position
Verify If The Inverter Is Off
Start The Lockout Tagout Procedure
Let me further discuss each step in the preceding paragraphs below with more details. This article aims to guide you to safely and successfully turn off a solar inverter. It will allow you to proceed with the activities you want to do with it shut down. So, let’s go!
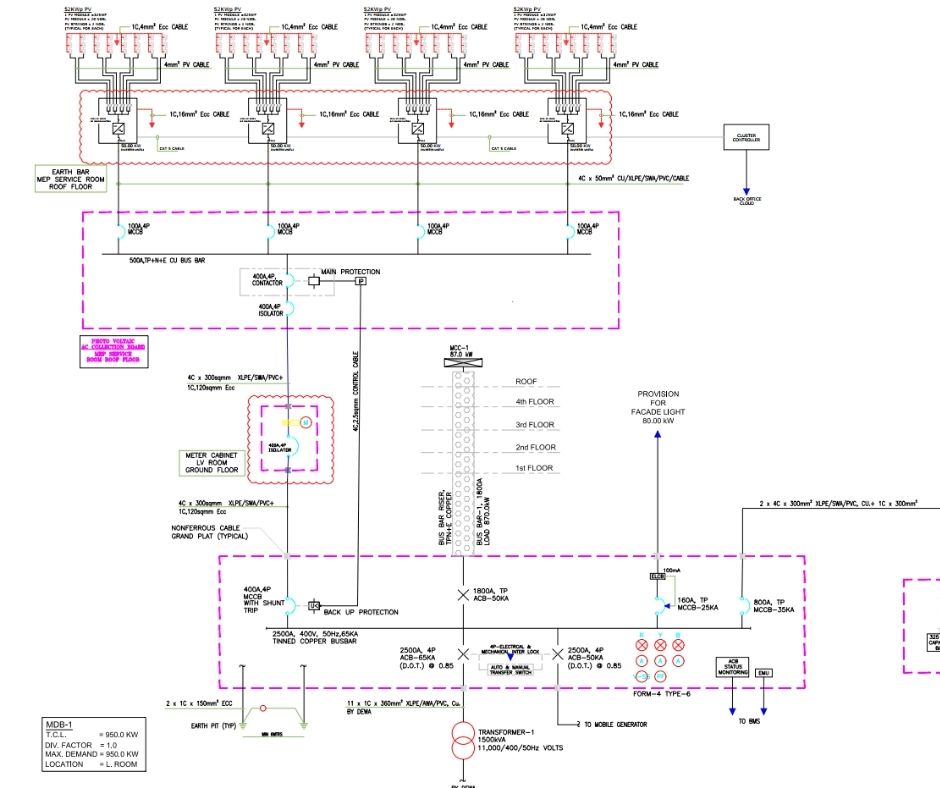
Step #1. Check And Read The Single Line Diagram Of The System
It is a smart move to first check the Single Line Diagram (or SLD) of the solar PV system before doing anything else.
The SLD will provide you a basic overview and important details about the solar power system. Most single-line diagrams will give you the details as listed below.
What Is A Solar PV System Single-Line Diagram?
Single-line diagrams for a solar PV system is a simplified layout that shows how solar panels, inverters, combiner boxes and main power switchboards are connected electrically. It is an important piece of drawing that would also be submitted to local authorities prior to getting an approval.
Most of the good-quality solar power systems will also have SLDs packed with comprehensive information. See the list of details below which you could find in a solar PV system single-line diagram.
Solar PV System Total Capacity
Number of Solar Panels
Number of Inverters
Solar Panel Power Output
Number of Solar PV Strings
Solar Panel Model
Solar Inverter Model
Metering Details
Solar Inverter Size
Breaker Sizes
Fuse Sizes
Cable Sizes
Earthing Details
AC Combiner Box Details
General Location of Electrical Boards
Point of Connection Details
Battery System Details (if available)
Generator Details (if available)
Other Electrical Energy Sources
However, you might also find other single-line diagrams with the basic information only in them.
Why Do You Need To Have An SLD?
Some projects may not have a single line diagram, but this should not mean that you shouldn’t have it, even if it’s a DIY solar PV system. It would be best if you have an SLD because it gives the overall conceptual layout of your whole system.
If it is done accurately according to what has been installed, the SLD can provide a simple but comprehensive view of your solar PV system. It would help people understand how each component is connected. And it makes the operations and maintenance straightforward.
Having an SLD will not only help on the maintenance side but also in the daily operation of your solar power plant. Regardless of the size and how you did it, a single line diagram is an essential part of your solar PV system.
Step #2. Go And Find The Solar AC Distribution Board
Now, you have to locate where the Solar AC Distribution Board is. In some places, it is also called Solar AC Combiner Box. The AC output cable from the inverter will be terminated through a circuit breaker and other inverters.
The SLD can usually indicate the location of this AC combiner box. Generally, you can find it in the electrical room of the building or a special place for the solar PV components within the premises.
Step #3. Turn The Inverter’s AC Breaker To Off Position
To do this, you have to open the AC combiner box first. Then, you should be able to locate the breaker which is connected to the inverter you wish to disconnect or turn off.
You will appreciate more the importance of proper labels in situations like these. The breaker labels should be visible and apparent inside the AC combiner box so that you will easily avoid any mistakes and mishaps.
Once you have determined which breaker is for the inverter you want to stop operating, flick the breaker switch to the off position.
You may want to verify this with a tester or a multimeter to see that there is no power anymore that goes into your inverter.
Why Do We Turn Off The AC Side First?
We have to consider that during the day when the inverter is operating, its DC side is actively supplying power at higher voltages. The solar arrays usually have voltages ranging from 400V to 1000V.
On the other hand, the AC side of the inverter will have a voltage ranging from 350V to 480V for 3-phase systems and 110V to 250V for single-phase systems.
Thus, turning off the AC breaker of the inverter first is recommended by most inverter manufacturers when disconnecting it from the system. It is the safest way for the equipment within the solar power plant, but it also avoids the potential harm of directly unloading the high DC voltage of the solar arrays.
Step #4. Go And Find The Solar Inverter
Now that the AC side of the inverter is already switched off, it’s time to go to the actual inverter you want to stop operating. you can usually find the details of its location in the single-line diagram.
The inverter can be located in the field, in the electrical room, or the inverter room.
Step #5. Turn The Inverter’s DC Switch To Off Position
Once you have found the solar inverter, make sure that it is the right one that you want to shut off. Check its labels if there is any or at least have a look again at the system’s single-line diagram. It should match the model and the marking of the details on the SLD.
Before doing anything, make sure you have a copy of the inverter’s manual. Since each different model of the inverter will come with its own unique design, make sure that you verify if it has a DC switch attached to it or not.
In most cases, the DC switch to the inverter is in-built to its body. Otherwise, you may also find a separate DC isolator or isolator depending on the number of string inputs connected to the inverter.
When you have found the DC switch or DC isolator, turn it to off position and your job is almost done.
For the example picture shown above, the upward direction of the rotary-type switch means it is on. Just turn it to the left and when you hear a click, that means it is off.
Step #6. Verify If The Inverter Is Off
By now, you have already switched the DC switch of the inverter to the off position. You may need to wait for few seconds before you can verify that the inverter has finally been shut off.
Check for the indicators, which will tell you if the inverter is off now. It will have LED light indicators or even a small screen where you usually see its status in most inverters. Make sure all lights and screens are dead.
This step is crucial, especially when you want to open the inverter or remove its cover. Go the extra mile if needed to make sure all is safe. You may use a clamp meter to measure the currents in the cables. Or, you may even use a multi-tester to measure up the voltages and confirm if the inverter is now shut off.
By verifying that it is now shut down, you will be more secure that there is no more electrical power in it. This means nothing could potentially cause danger to anyone near the area anymore.
Step #7. Start The Lock Out Tag Out Procedure
Now that you have confirmed and verified that the inverter is off, you can immediately start doing the lock-out tag-out procedures. And also, placing warning signs and tags will more added safety and security to the operation.
Lockout, tag-out (LOTO) is a safety procedure used in industry and research settings to ensure that dangerous machines are properly shut off and cannot be started up again before the completion of maintenance or repair work. It requires that hazardous energy sources be “isolated and rendered inoperative” before work is started on the equipment in question. The isolated power sources are then locked, and a tag is placed on the lock identifying the worker who placed it. The worker then holds the key for the lock, ensuring that only they can remove the lock and start the machine. This prevents the accidental startup of a device while it is in a hazardous state or while a worker is in direct contact with it.
Make sure that you have locked out the breakers and switches that are connected to this specific inverter. It will help others be aware of what’s going on with the solar power plant.
Having the safety tags in place, accidental turning on the AC or DC breakers will be avoided, thus averting any unfortunate mishaps or workplace accidents.
This step may look simple, but it can save a life.
What Happens To Solar Arrays When The Inverter Is Off?
When the inverter is off, the energy that is being harvested by the solar arrays won’t flow to your home. The solar panels will still have its capability to supply power. But, it will remain as potential energy as it is not connected to the load yet.
However, it will not store the solar energy anywhere, especially if there’s no battery system attached to it. Solar arrays will exist like shading material only.
Once the inverter comes back online and functioning, the solar arrays will start pumping solar energy again. Solar energy can then be utilized to power the loads or be exported to the grid.
Do Solar Inverters Turn Off At Night?
Most solar inverters will have to “sleep” during the night. When the sun goes down, there’s no need for the device to run because there is no power input from the solar arrays. It means no DC power needs to be converted into AC, which is the primary purpose of this device. Modern solar inverters are programmed to go “sleep mode” when it does not sense any power coming from the solar panels anymore. It means the inverter automatically goes to a mode wherein it shuts itself off. The inverter will then only consume a minimum amount of energy to power a few circuits. When the sun comes up in the morning, it will “wake up” and start converting DC to AC electricity again. The process repeats day after day.
Conclusion: How To Turn A Solar Inverter Off
The instructions presented to you here could be helpful when you want to manually shutdown an inverter or more in your solar PV system. By carefully following the steps above, you will be able to safely and properly switch off your solar inverter. This means you can proceed with any maintenance or inspection activities.
To restart the inverter, you may follow the same steps but do it in a reverse manner.
If you want to learn more about solar power and other renewable energy sources, sign up to our email list now and be part of the Solar Powered Fam! Yes, you belong to this family.
Summary
Article Name
How Do You Turn A Solar Inverter Off: Manual Shutdown Procedure
He loves to read news and articles about renewable energy and technology. He is experienced in the solar energy industry. He loves to write articles, guides, and tutorials about solar PV technology.


? The Simplest Answer")


? The Simplest Answer")


